2.1.1 MRI sequence
MRI data types depend on the sequence employed during scanning. An MRI sequence consists of a series of radiofrequency pulses and gradients that produce images with distinct characteristics. For instance, consider a property from the EPI BOLD sequence commonly used in functional imaging.
In each experiment, multiple sequences may be applied—such as resting-state fMRI, T1-weighted structural scans, or EP2d BOLD sequences. Each sequence generates its own set of images stored in separate subfolders within the study directory; these folders are typically named to reflect their corresponding sequences. Below is an example drawn from sample data in Cemre’s study. Can you identify which sequences were used?
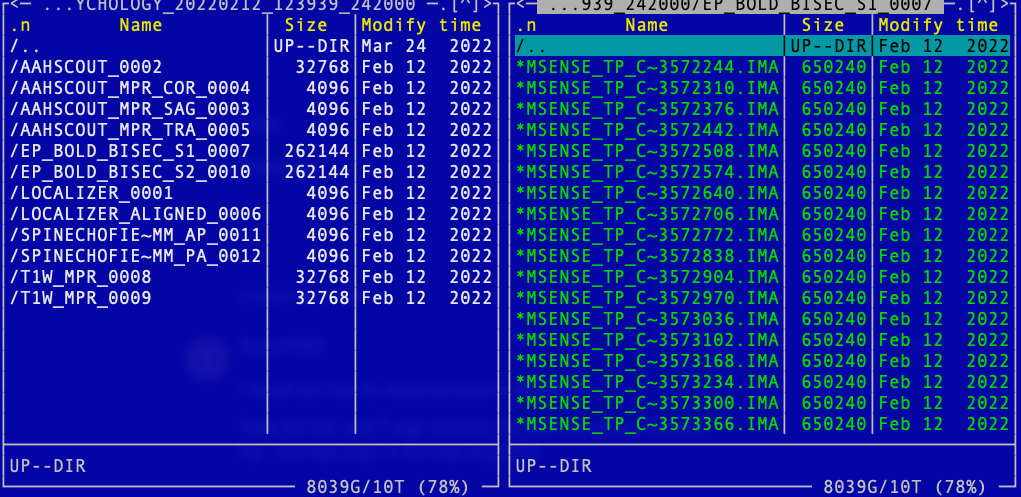
The folder name reflects a combination of protocol, task, and serial number, allowing you to infer the sequence it contains. For instance, folders labeled T1W_MPR_* correspond to T1-weighted scans, while those named EP_BOLD_BISEC_S* hold fMRI BOLD data from the bisection task across two sessions.
Within each folder, it stores individual DICOM images, like this:
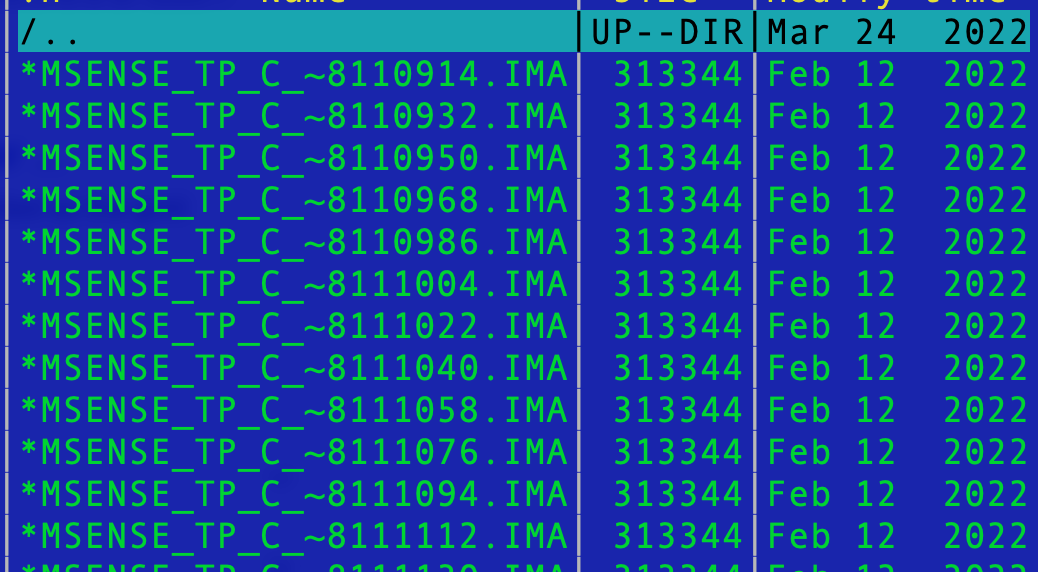
DICOM stands for Digital Imaging and Communications in Medicine. Each image contains independent metadata, which is redundant for our purposes. If you perform a scan 1,000 times, you will end up with 1,000 separate DICOM files in that folder. To better organize your data, it is preferable to convert the DICOM files into NIfTI format—producing a single file per scan run.
2.1.2 DICOM → BIDS conversion
DICOM-to-NIfTI conversion is only the first half of MRI data preparation. For analysis, we normally want a BIDS dataset: NIfTI images plus JSON sidecars, organised with stable names such as sub-01_task-rest_run-01_bold.nii.gz.
Use this source-data layout before conversion:
/project/
  sourcedata/
    dicom/
      sub-01/
        ses-01/          # optional; use only if the study has sessions
          <scanner DICOM export>
      sub-02/
        ses-01/
          ...
The converter should create a BIDS dataset like this:
/project/
  dataset_description.json
  participants.tsv
  sub-01/
    ses-01/              # omitted if the study has no sessions
      anat/
      func/
      fmap/
Important rules:
- Keep the original DICOM export unchanged under
sourcedata/dicom/. - Prototype the conversion on one subject first.
- Use the first subject to inspect scanner sequence names, then write the mapping from sequences to BIDS filenames.
- Validate the BIDS output before running MRIQC or fMRIPrep.
Which converter should I use?
Use heudiconv when the conversion should become a reusable lab/server pipeline. It stores the sequence-to-BIDS mapping in a Python heuristic.py, uses dcm2niix under the hood, and is easiest to freeze in a container.
Use dcm2bids when you want a simpler teaching example or a one-off conversion. Its JSON config is easier to read for beginners, and it works well from a project-local uv environment.
A good practical workflow is:
- Inspect one subject.
- Write either a
heuristic.py(heudiconv) orconfig.json(dcm2bids). - Convert one subject.
- Validate BIDS.
- Batch-convert all subjects only after the first subject looks right.
2.1.3 Option A: heudiconv, recommended for lab pipelines
Install / run heudiconv
On the MSense server, prefer the shared Singularity/Apptainer image rather than installing packages into your shell:
export HEUDICONV_IMG=/dss/containers/heudiconv.sif
singularity exec "$HEUDICONV_IMG" heudiconv --version
For a new project, record the image source, version, and checksum:
singularity pull /dss/containers/heudiconv.sif docker://nipy/heudiconv:latest
singularity exec /dss/containers/heudiconv.sif heudiconv --version
sha256sum /dss/containers/heudiconv.sif
For this tutorial project, the current server image is:
/dss/containers/heudiconv.sif
heudiconv 1.4.0
sha256: a79b8197f76b473b1b94600353d0fedecbbcbf423df5bba0399b63234afba98f
If you are working on a laptop and really want a local uv install instead of a container:
mkdir -p ~/fmri-conversion-demo
cd ~/fmri-conversion-demo
uv init --bare --python "==3.11.*"
uv python pin 3.11
uv add "heudiconv[all]>=1.4,<2" dcm2niix
uv run heudiconv --version
Container execution is still preferred for shared projects because it avoids Python-package drift.
Step 1 — inspect one subject without conversion
This tutorial project includes reusable scripts in /dss/studies/ncp-fmri-tutorial/code/00_bids_conversion/.
cd /dss/studies/ncp-fmri-tutorial
HEUDICONV_IMG=/dss/containers/heudiconv.sif \
  code/00_bids_conversion/run_heudiconv_inspect.sh 01
This runs the equivalent of:
PROJECT_DIR=/dss/studies/ncp-fmri-tutorial
SUBJECT_LABEL=01
DICOM_ROOT="$PROJECT_DIR/sourcedata/dicom"

singularity run --cleanenv \
  --bind "${PROJECT_DIR}:${PROJECT_DIR}" \
  "$HEUDICONV_IMG" \
  --files "${DICOM_ROOT}/sub-${SUBJECT_LABEL}" \
  -s "${SUBJECT_LABEL}" \
  -f convertall \
  -c none \
  -o "${PROJECT_DIR}" \
  --overwrite
After this step, inspect the generated .heudiconv/ folder. The key file is usually a dicominfo.tsv-style summary containing scanner sequence names, dimensions, TR/TE, and series IDs. Use that file to decide how each sequence should map to BIDS.
Step 2 — edit heuristic.py
The heuristic maps scanner sequences to BIDS filenames. A minimal pattern looks like this:
from heudiconv.utils import SeqInfo


def create_key(template, outtype=("nii.gz",), annotation_classes=None):
    if template is None or not template:
        raise ValueError("Template must be a valid format string")
    return template, outtype, annotation_classes


def infotodict(seqinfo: list[SeqInfo]):
    t1w = create_key("sub-{subject}/anat/sub-{subject}_T1w")
    task_run01 = create_key("sub-{subject}/func/sub-{subject}_task-tutorial_run-01_bold")
    task_run02 = create_key("sub-{subject}/func/sub-{subject}_task-tutorial_run-02_bold")

    info = {t1w: [], task_run01: [], task_run02: []}

    for s in seqinfo:
        protocol = (s.protocol_name or "").lower()
        description = (s.series_description or "").lower()

        if "t1" in protocol or "mprage" in protocol or "t1" in description:
            info[t1w].append(s.series_id)
        elif "bold" in protocol and "run1" in protocol:
            info[task_run01].append(s.series_id)
        elif "bold" in protocol and "run2" in protocol:
            info[task_run02].append(s.series_id)

    return info
Do not copy these matching rules blindly. Replace task-tutorial, run1, run2, and the sequence patterns with the real names from your dicominfo.tsv.
Step 3 — convert one subject
cd /dss/studies/ncp-fmri-tutorial
HEUDICONV_IMG=/dss/containers/heudiconv.sif \
  code/00_bids_conversion/run_heudiconv_convert_one.sh 01
Generic command:
PROJECT_DIR=/dss/studies/ncp-fmri-tutorial
SUBJECT_LABEL=01
DICOM_ROOT="$PROJECT_DIR/sourcedata/dicom"
HEURISTIC="$PROJECT_DIR/code/00_bids_conversion/heuristic.py"

singularity run --cleanenv \
  --bind "${PROJECT_DIR}:${PROJECT_DIR}" \
  "$HEUDICONV_IMG" \
  --files "${DICOM_ROOT}/sub-${SUBJECT_LABEL}" \
  -s "${SUBJECT_LABEL}" \
  -f "${HEURISTIC}" \
  -c dcm2niix \
  -b --minmeta \
  -o "${PROJECT_DIR}" \
  --overwrite
Inspect sub-01/ before converting everyone else. Check that functional runs have the right task- and run- labels and that field maps, if present, point to the correct target BOLD runs.
2.1.4 Option B: dcm2bids with uv, simple teaching route
dcm2bids can be installed without conda. Use uv to keep the converter and dcm2niix in a local project environment.
Step 0 — create a local uv environment
mkdir -p /project/name
cd /project/name
uv init --bare --python "==3.11.*"
uv python pin 3.11
uv add "dcm2bids>=3,<4" "dcm2niix>=1"
uv run dcm2bids --version
uv run dcm2niix -h
This creates .python-version, .venv/, and uv.lock in the project. Commit .python-version and uv.lock if this is a real project repository.
For a quick one-off test, you can also run the tool without creating a project:
uvx --from "dcm2bids>=3,<4" --with dcm2niix dcm2bids --versionStep 1 — scaffold an empty BIDS project
PROJECT_DIR=/project/name
uv run dcm2bids_scaffold -o "$PROJECT_DIR"
This creates starter files such as dataset_description.json, participants.tsv, and a code/ folder.
Step 2 — inspect one subject with the helper
DICOM="$PROJECT_DIR/sourcedata/dicom/sub-01/ses-01"
OUT="$PROJECT_DIR"

uv run dcm2bids_helper \
  -d "$DICOM" \
  -o "$OUT" \
  --force
The helper converts candidate series into a temporary folder and writes JSON sidecars. Look under tmp_dcm2bids/helper/ or the path printed by the command. The JSON sidecars contain fields such as SeriesDescription, ProtocolName, EchoTime, and PhaseEncodingDirection; these are the fields you use in config.json.
Step 3 — write code/config.json
dcm2bids uses a list of descriptions. Each description says which sidecar JSONs to match and where to place them in BIDS. In dcm2bids 3.x, matching uses shell-style wildcards such as *bold*, not Python regular expressions.
{
  "descriptions": [
    {
      "datatype": "anat",
      "suffix": "T1w",
      "criteria": {
        "SeriesDescription": "*T1*"
      }
    },
    {
      "id": "id_task_tutorial_run01",
      "datatype": "func",
      "suffix": "bold",
      "custom_entities": "task-tutorial_run-01",
      "criteria": {
        "SeriesDescription": "*bold*run1*"
      },
      "sidecar_changes": {
        "TaskName": "tutorial"
      }
    },
    {
      "datatype": "fmap",
      "suffix": "epi",
      "custom_entities": "dir-AP",
      "criteria": {
        "SeriesDescription": "*SpinEcho*AP*"
      },
      "sidecar_changes": {
        "IntendedFor": "id_task_tutorial_run01"
      }
    }
  ]
}
Adjust the wildcards to the actual scanner names from your helper output. If a rule catches too many series, add stricter criteria such as ProtocolName, EchoTime, or ImageType.
Step 4 — convert one subject
uv run dcm2bids \
  -d "$PROJECT_DIR/sourcedata/dicom/sub-01/ses-01" \
  -p 01 \
  -s 01 \
  -c "$PROJECT_DIR/code/config.json" \
  -o "$PROJECT_DIR" \
  --force_dcm2bids
If your study has no sessions, drop the -s 01 argument and remove the ses-01 level from the DICOM path.
Step 5 — batch-convert only after the one-subject test works
for SUB in 01 02 03; do
  uv run dcm2bids \
    -d "$PROJECT_DIR/sourcedata/dicom/sub-${SUB}/ses-01" \
    -p "$SUB" \
    -s 01 \
    -c "$PROJECT_DIR/code/config.json" \
    -o "$PROJECT_DIR" \
    --force_dcm2bids
done
2.1.5 Validate the BIDS dataset
Run validation before MRIQC or fMRIPrep. With the Deno-based validator:
deno run -A jsr:@bids/validator "$PROJECT_DIR"If you use dcm2bids, you can also ask it to validate immediately after conversion:
uv run dcm2bids \
  -d "$PROJECT_DIR/sourcedata/dicom/sub-01/ses-01" \
  -p 01 \
  -s 01 \
  -c "$PROJECT_DIR/code/config.json" \
  -o "$PROJECT_DIR" \
  --bids_validate
Common things to fix at this stage:
- Missing
TaskNamein*_bold.json. - Wrong or missing
run-labels. - Field maps missing
IntendedFor. - Case collisions such as
task-Localizerandtask-localizerin the same dataset. - Files written into the wrong level, for example under
sourcedata/instead of the BIDS root.
2.1.6 Other converters
MRIcroGL
MRIcroGL is useful for quick visual/manual conversion. Open MRIcroGL, select Import → Convert DICOM to NIfTI, choose the DICOM folder, and set the output naming rule. Two useful filename tokens are %p for protocol name and %s for series number.
MRIcroGL/dcm2niix will create:
- one
.niior.nii.gzimage file; - one
.jsonsidecar containing acquisition metadata.
This is fine for inspecting data, but it does not by itself create a complete BIDS dataset. For projects, use heudiconv or dcm2bids so the conversion is scripted and repeatable.
2.1.7 Compress raw data
Given raw data include lots of small files, which will eventually explode our data science storage, not because of the size, but because of the limited number of files we can store (maximum: 8 million). I suggest to put the following bash code (file) to your raw folder to compress individual subfolders.
#!/bin/bash
# Get a list of all subdirectories in the current directory

for dir in */ ; do
	# Remove the trailing slash to get the directory name
	dir_name=${dir%/}
	# Compress the directory into a tar.gz file with the same name
	tar -czvf "${dir_name}.tar.gz" "${dir_name}"
done
echo "All subfolders have been compressed."
After the compression, you can safely remove subfolders. You can modify the above script to do this.
What not compress all subject data together
In principle you can also compress all subject data to one single tar.gz file. However, I would recommend compressing individual participants, as we may want to convert or do further things with individual data. If you compress all data together, unzipping the whole dataset may take more time (prob. minutes to hours), and you have to expand all files. Even though there is a way to extract partial data, extracting folder structure from a huge zip file takes time. Trust me.